Thymeleaf (타임리프)
웹 및 독립 실행형 환경 모두를 위한 최신 서버 측 Java 템플릿 엔진
HTML 파일에서 th(Thymeleaf) 속성을 이용해 컨트롤러로 부터 전달 받은데이터를 이용해 동적 페이지를 만들 수 있음.
Spring Boot에서는 JSP가 아닌 Thymeleaf 사용을 권장하고 있음.
🪄 Thymeleaf 사용 준비
[Maven] - pom.xml
<dependency>
<groupId>org.springframework.boot</groupId>
<artifactId>spring-boot-starter-thymeleaf</artifactId>
</dependency>
[Gradle] - build.gradle
implementation 'org.springframework.boot:spring-boot-starter-thymeleaf’
application.properties
# thymeleaf 접두사, 접미사 설정
#미작성 시 기본값
#spring.thymeleaf.prefix=classpath:/templates/
#spring.thymeleaf.suffix=.html
| @Slf4j | log 필드 생성 및 초기화 자동완성 lombok 어노테이션 |
| @RequestMapping("OOO") | /OOO로 시작하는 요청을 매핑 |
| @Controller | 컨트롤러임을 명시 + bean 등록 |
▷ Model
- org.springframework.ui 패키지
- Spring에서 데이터를 전달하는 역할의 객체
- 데이터 유지 범위(scope) : 기본 request
- @SessionAttributes 와 함꼐 사용하면 session scope로 변경
[Model을 이용해서 값을 세팅하는 방법]
Model.addAttribute("key", value);
▷ Servlet/JSP 내장 객체 4종류의 데이터 유지 범위(scope)
| page | 현재 페이지 |
| request | 요청 받은 곳 + 요청 위임(forward) 받은 페이지 |
| session | 클라이언트가 서버 최초 접속 시 생성, 연결한 브라우저 종료 또는 세션 시간 만료까지 |
| application | 서버 실행 시 1개만 생성 서버가 종료 될 때까지 유지 |
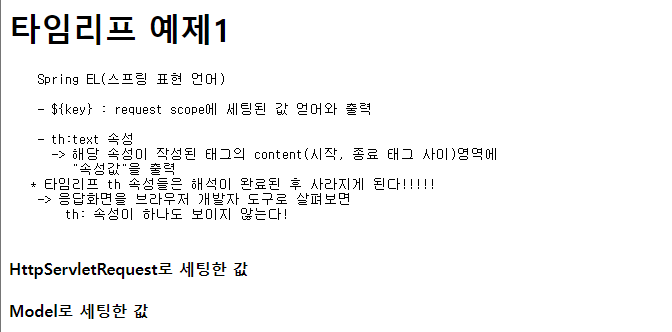
Spring EL(스프링 표현 언어)
- ${key} : request scope에 세팅된 값 얻어와 출력
- th:text 속성
→ 해당 속성이 작성된 태그의 content(시작, 종료 태그 사이)영역에
"속성값"을 출력
* 타임리프 th 속성들은 해석이 완료된 후 사라지게 된다!!!!!
→ 응답화면을 브라우저 개발자 도구로 살펴보면 th: 속성이 하나도 보이지 않는다!
th:block 태그
- 타임리프에서 제공하는 유일한 태그
(나머진 다 속성)
- th 속성을 사용할 만한 마땅한 태그가 없을 경우에
임시로 사용하는 목적으로 만들어진 태그
- th:text 보단 조건문, 반복문에서 더 많이 사용함
th:each="item : ${list}"
- 해당 HTML 요소를 list의 길이 만큼 반복
- list에 저장된 요소를 순차접근하여 item에 저장
- 해당 코드가 작성된 HTML요소 내부에서 item 사용 가능
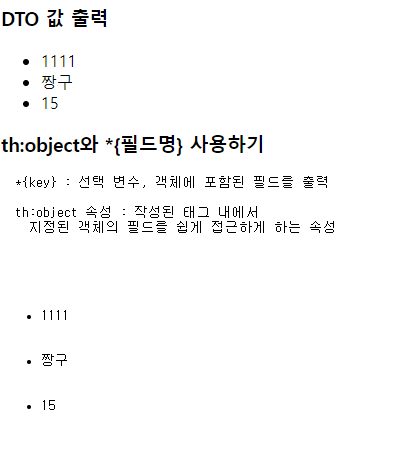
th:object와 *{필드명} 사용
*{key} : 선택 변수, 객체에 포함된 필드를 출력
th:object 속성 : 작성된 태그 내에서
지정된 객체의 필드를 쉽게 접근하게 하는 속성
#예제1
[main.html]
<!DOCTYPE html>
<html lang="en" >
<head>
  <meta charset="UTF-8">
  <meta name="viewport" content="width=device-width, initial-scale=1.0">
  <title>Thymeleaf</title>
</head>
<body>
  <!-- fr-test 조각으로 변경 -->
   <div class="aaa" th:replace="~{fragments/temp :: fr-test}"></div>
  <h1>Thymeleaf</h1>

  <ol>
    <li>
      <a href="/example/ex1">타임리프 예제 1</a>
    </li>


</body>
</html>
[MainController]
package edu.kh.demo.controller;

import org.springframework.stereotype.Controller;
import org.springframework.web.bind.annotation.RequestMapping;

@Controller  // 컨트롤러 역할 (요청, 응답 제어) 명시 + Bean 등록
public class MainController {

	// "/" 요청 (== localhost, 최상위 주소) 시
	// 매핑하여 처리하는 메서드
	// -> index.html로 응답하는 것이 아닌
	//			해당 메서드에서 요청 처리/응답 수행

	// 장점 : java를 거쳐서 메인페이지가 보여짐
	//    -> 추가 세팅 값, DB 조회 값을 위임된 html에서 출력 가능
	//   == 메인 페이지에서 부터 DB 조회 값이 보여지게 된다

	@RequestMapping("/")
	public String mainPage() {

		// 사용하는 템플릿 엔진 : Thymeleaf
		// Thymeleaf를 사용하는 프로젝트에서 forward시
		// 제공하는 접두사 : classpath:/templates/
		// 제공하는 접미사 : .html


		// classpath:/templates/common/main.html 파일로 forward
		return "common/main";

	}


}
[ExampleController]
package edu.kh.demo.controller;

import java.util.ArrayList;
import java.util.List;

import org.springframework.stereotype.Controller;
import org.springframework.ui.Model;
import org.springframework.web.bind.annotation.GetMapping;
import org.springframework.web.bind.annotation.PathVariable;
import org.springframework.web.bind.annotation.PostMapping;
import org.springframework.web.bind.annotation.RequestMapping;

import edu.kh.demo.dto.Student;
import jakarta.servlet.http.HttpServletRequest;
import lombok.extern.slf4j.Slf4j;

@Slf4j // log 필드 생성 및 초기화 자동완성 lombok 어노테이션
@RequestMapping("example") // /example로 시작하는 요청을 매핑
@Controller // 컨트롤러임을 명시 + bean 등록
public class ExampleController {


//Servlet/JSP 내장 객체 4종류의 데이터 유지 범위(scope)

		// 1) page : 현재 페이지
		// 2) request : 요청 받은 곳 + 요청 위임(forward) 받은 페이지
		// 3) session : 클라이언트가 서버 최초 접속 시 생성,
		//				연결한 브라우저 종료 또는 세션 시간 만료까지
		// 4) application : 서버 실행 시 1개만 생성
		//               서버가 종료 될 때까지 유지


	/* Model
	 *  - org.springframework.ui 패키지
	 *
	 *  - Spring에서 데이터를 전달하는 역할의 객체
	 *
	 *  - 데이터 유지 범위(scope) : 기본 request
	 *
	 *  - @SessionAttributes 와 함꼐 사용하면 session scope로 변경
	 *
	 *  [Model을 이용해서 값을 세팅하는 방법]
	 *  Model.addAttribute("key", value);
	 */

	@GetMapping("ex1")
	public String ex1(HttpServletRequest req, Model model) {

			// request scope에 값 세팅
			req.setAttribute("test1", "HttpServletRequest로 세팅한 값");

			// model을 이용해서 request scope 값 세팅
			model.addAttribute("test2", "Model로 세팅한 값");

			// 단일 값 세팅(숫자 문자열)
			model.addAttribute("productName", "아이스 아메리카노");
			model.addAttribute("price", 2000);

			// 복수 값 세팅(배열, List)
			List<String> fruitList = new ArrayList<>();
			fruitList.add("복숭아");
			fruitList.add("딸기");
			fruitList.add("수박");
			fruitList.add("바나나");

			model.addAttribute("fruitList", fruitList);

			//DTO 객체를 만들어 Model에 세팅 + 빌더 패턴 사용
			Student std = Student.builder()
								.studentNo("1111")
								.name("짱구")
								.age(15)
								.build();
			// -> 필드 전체가 아닌 일부 초기화 시 활용도가 좋음


			log.debug("std : {}", std);

			model.addAttribute("std", std);


		//---------------------------------------------------

		// DTO 필드 중 List가 포함되어 있는 경우
			List<String> hobbyList = new ArrayList<>();
			 hobbyList.add("축구");
			 hobbyList.add("독서");
			 hobbyList.add("코딩 공부");

			 Student std2 = Student.builder()
					 			.studentNo("2222")
					 			.name("철수")
					 			.age(20)
					 			.hobbyList(hobbyList)
					 			.build();

			 model.addAttribute("std2", std2);

		// classpath:/templates/ex/result1.html 파일로
		// forward(요청 위임)
		return"ex/result1";
	}

}
[Student.java]
@Getter
@Setter
@NoArgsConstructor
@AllArgsConstructor
@ToString
@Builder // 빌더 패턴을 위한 메서드 자동완성 어노테이션
		 // 빌더 패턴 : 특정한 값으로 초기화된 객체를 쉽게 만들기 위한
		 //			메서드를 만드는 패턴
public class Student {
	private String studentNo;			  // 학번
	private String name;    			// 이름
	private int age;					// 나이
	private List<String> hobbyList; // 취미목록

	}
[result1]
<!DOCTYPE html>
<html lang="en" xmlns:th="http://www.thymeleaf.org">
<head>
  <meta charset="UTF-8">
  <meta name="viewport" content="width=device-width, initial-scale=1.0">
  <title>타임리프 예제1</title>
</head>
<body>
  <h1>타임리프 예제1</h1>


  </pre>
  <!-- t:tex -->
  <h4 th:text="${test1}">key값 test1에 세팅된 값</h4>
  <h4 th:text="${test2}">key값 test2에 세팅된 값</h4>

  <hr>

  <h3>단일 값 출력</h3>


  <p>

    상품명 : <th:block th:text="${productName}"></th:block>
    <br>
    가격 : <th:block th:text="${price}"></th:block>원

  </p>

  <hr>
  <h3>복수(다수) 값 출력</h3>
  <p th:text="${fruitList}"></p>

  <h4>fruitList에 저장된 요소 1개씩 출력 - index 이용</h4>
  <pre>
    - 지정된 index 번째 요소를 얻어올 수 있음
    - 단, 작성법은 배열, 리스트 가리지 않고 모두 [index]
  </pre>
  <ul>
    <li th:text="${fruitList[0]}"></li>
    <li th:text="${fruitList[1]}"></li>
    <li th:text="${fruitList[2]}"></li>
    <li th:text="${fruitList[3]}"></li>
  </ul>

  <h4>fruitList에 저장된 요소 1개씩 출력 - th:each 이용</h4>

  <pre>
    th:each="item : ${list}"

    - 해당 HTML 요소를 list의 길이 만큼 반복

    - list에 저장된 요소를 순차접근하여 item에 저장

    - 해당 코드가 작성된 HTML요소 내부에서 item 사용 가능
  </pre>

  <ul>
    <!--
      th:block 태그를 이용해서 반복문 th:each 작성
      -> 반복이 끝나면 th:block태그는 사라짐
    -->
    <th:block th:each="f : ${fruitList}">
      <li th:text="${f}"></li>
    </th:block>
  </ul>

  <hr>
  <h3>DTO 값 출력</h3>

  <ul>
    <li th:text="${std.studentNo}">학번</li>
    <li th:text="${std.name}">이름</li>
    <li th:text="${std.age}">나이</li>
  </ul>

  <h3>th:object와 *{필드명} 사용하기</h3>
  <pre>
  *{key} : 선택 변수, 객체에 포함된 필드를 출력

  th:object 속성 : 작성된 태그 내에서
    지정된 객체의 필드를 쉽게 접근하게 하는 속성

  <ul th:object="${std}">
    <li th:text ="*{studentNo}">학번</li>
    <li th:text ="*{name}">이름</li>
    <li th:text ="*{age}">나이</li>
  </ul>

  <hr>

  <h4>DTO 필드 중 List가 포함된 경우</h4>
  <ul th:object="${std2}">
    <li th:text="*{studentNo}"></li>
    <li th:text="*{name}"></li>
    <li th:text="*{age}"></li>

    <ul>
      <li th:each="hobby : *{hobbyList}"
          th:text="${hobby}">취미</li>

    </ul>

  </ul>

  </pre>
</body>
</html>
\


#예제2
[main.html]
    <li>
      <form action="/example/ex2" method="post">
        <h4>타임리프 예제 2</h4>

        이름 : <input type="text"   name="inputName"> <br>
        나이 : <input type="number" name="inputAge">  <br>
        <br>

        색상 :
        Red   <input type="checkbox" name="color" value="Red">
        Green <input type="checkbox" name="color" value="Green">
        Blue  <input type="checkbox" name="color" value="Blue">

        <button>제출하기</button>
      </form>
    </li>
[ExampleController]
package edu.kh.demo.controller;
import java.util.ArrayList;
import java.util.List;
import org.springframework.stereotype.Controller;
import org.springframework.ui.Model;
import org.springframework.web.bind.annotation.GetMapping;
import org.springframework.web.bind.annotation.PathVariable;
import org.springframework.web.bind.annotation.PostMapping;
import org.springframework.web.bind.annotation.RequestMapping;
import edu.kh.demo.dto.Student;
import jakarta.servlet.http.HttpServletRequest;
import lombok.extern.slf4j.Slf4j;
@Slf4j // log 필드 생성 및 초기화 자동완성 lombok 어노테이션
@RequestMapping("example") // /example로 시작하는 요청을 매핑
@Controller // 컨트롤러임을 명시 + bean 등록
public class ExampleController {
/**
*
* @param model : Spring에서 데이터를 전달하는 용도의 객체
* (기본 scope : request)
* @return
*/
@PostMapping("ex2") // /example/ex2 POST 방식 요청 매핑
public String ex2(Model model) {
model.addAttribute("str", "<h1>테스트 중입니다...× </h1>");
// classpath:/templates/ex/result2.html 파일로
// forward(요청 위임)
return "ex/result2";
}
[result2.html]
<!DOCTYPE html>
<html lang="en" xmlns:th="http://www.thymeleaf.org">
<head>
  <meta charset="UTF-8">
  <meta name="viewport" content="width=device-width, initial-scale=1.0">
  <title>타임리프 예제2</title>
</head>
<body>
  <h1>타임리프 예제2</h1>

  <h3> ${param.key} : 제출된 파라미터 얻어오기 </h3>

  <!-- | 내용 | : 내용 그대로를 출력 -->

  <!-- 제출된 이름 : 홍길동 -->
  <h4 th:text="|제출된 이름 : ${param.inputName}|"></h4>
  <h4 th:text="|제출된 나이 : ${param.inputAge}|"></h4>

  <!-- 같은 key값의 파라미터가 여러 개면 배열 형태로 반환됨 -->
  <h4 th:text="|선택한 색상 : ${param.color}|"></h4>

  <ol>  <!-- 선택된 색상이 없으면 반복 X -->
    <li th:each="c : ${param.color}"
        th:text="${c}">
        선택한 색상
    </li>
  </ol>

  <hr>

  <h3> th:text   VS   th:utext</h3>

  <pre>
    th:text = "속성값"
    - 해당 태그에 "속성값"을 내용으로 출력
    - 단, html 태그, 특수문자 해석 X (innerText)

    th:utext = "속성값"
    - 해당 태그에 "속성값"을 내용으로 출력
    - 단, html 태그, 특수문자 해석 O (innerHTML)
  </pre>

  <h4>${str} 값을 th:text로 출력하기 -> innerText</h4>
  <th:block th:text="${str}"></th:block>

  <h4>${str} 값을 th:utext로 출력하기 -> innerHTML</h4>
  <th:block th:utext="${str}"></th:block>


  <hr>
  <h3>th:text / th:utext를 대체하는 특수 기호(괄호)</h3>

  <!--
    th:text  == [[...]]
    th:utext == [(...)]
  -->
  <p>
    str(text) : [[${str}]]
  </p>

  <p>
    str(utext) : [(${str})]
  </p>


  <script th:inline="javascript">
    // th:text / th:utext 특수 기호 실사용 예시

    const name = /*[[${param.inputName}]]*/ "inputName";
    console.log(name);
  </script>

  <hr>

  <h1>messages.properties 값 얻어와 출력하기</h1>

  <pre>
    #{key} : messages.properties에 작성된 값 중
            key가 일치하는 값을 얻어와 출력
  </pre>

  <h2 th:text="#{app.name}">앱 이름</h2>

  <!-- 이미지 출력(static폴더 기준으로 경로 작성) -->
  <img src="/images/logo.jfif" >

  <hr>
  <!-- th:src 속성 : 타임리프 구문을 해석한 후
                해당 태그의 src 속성으로 대입
    -->
  <img th:src="#{image.logo}">
   <!-- footer.html 파일을 해당 위치에 출력 -->
   <th:block th:replace= "~{fragments/footer}"></th:block>
</body>
</html>
'BackEnd > Spring' 카테고리의 다른 글
| [Spring]Spring Starter를 이용한 프로젝트 생성 (0) | 2024.10.06 |
|---|---|
| [Spring]Spring Boot 개발 환경 설정 (1) | 2024.10.06 |
| [Spring] Spring Boot (0) | 2024.09.03 |
| [Spring]IOC/DI (0) | 2024.09.03 |
| [Spring] Spring Framework 기본개념 (0) | 2024.09.03 |